This post looks at how to use Excel 2016 to build a bubble grid chart like the example below. Bubble grid charts of this type are basically decorated data tables - but the decoration should help non-expert readers to grasp the key messages more quickly than would a data table alone.
Figure 1: Outcomes for offences recorded in 2014/15 by offence type

Data source: Crime Outcomes in England and Wales 2014/15: Data tables, Table 2.3; https://www.gov.uk/government/statistics/crime-outcomes-in-england-and-wales-2014-to-2015
Use bubble grid charts when:
- it's more important for readers to notice the big messages quickly than to make detailed comparisons between similar results
- many categories are broken down by many result options
- there are substantial differences between categories and in the distribution of outcomes/results (bubble grid charts do not show subtle differences well).
Setting up tables for a bubble grid chart
First of all, have a look at the data table that you want to chart. I've made a simple table 'Fruit types by condition' as an example.
Figure 2: Fruit types by condition

Each of the numeric values in this table is going to end up corresponding with x-y coordinates on a grid. In this table I have five fruit types and eight different fruit conditions. I've also added a blank row, which will provide a placeholder for axis labels.
In addition, the fruit types and their possible conditions are also going to be assigned points within the grid, with their data labels replacing axis labels. This workaround is needed because Excel does not allow user-selected axis labels.
I'm going to set up another table to hold the x-y coordinates for all of the numeric data points within the chart, and some of the information that will be use for data labels.
Figure 3: Example of a grid table holding x-y coordinates for a bubble grid chart

The first column 'y-axis' includes a y-value for the x-axis labels ('0') and a y-value for each of the available conditions ('1' to '8'). I want the data for 'Peaches' to appear first in the chart, so have assigned it an x-value of '1'; 'Apples' will come next with an x-value of '2' and so on until all the types of fruit have an x-value.
Finally, I need to create x-values for the x-axis labels, and y-values for the y-axis labels. I've also created some columns with arbitrary bubble sizes, to make it easier to work with the chart.
Figure 4: Coordinates for axis labels and arbitrary bubble sizes for data labels

Remember - these are just arbitrary positions in a grid. They do not hold any information themselves: they just create a place for the data and axis labels to be.
Setting up the chart
Adding Bubbles
Select any points within the grid table and insert a flat bubble chart (not 3D!). Don't worry about selecting the full grid: you'll be removing the data series before adding new ones. I've already got my chart theme set up (find out how to set up chart themes in this tutorial), so I get something that looks like this.
Figure 5: Bubble grid chart Step 1.

First, format the chart area so that it does not move or resize with cells (under Format Chart Area -- Size and Properties -- Properties -- "Don't move or size with cells"). Then delete the chart title and remove all existing data series (Select Data Source - Remove)
Figure 6: Select Data screen: clear out those data series

That leaves a blank chart - so it's time to add in a first data series
Figure 7: Adding data series to bubble charts

"Peaches" is the series name (select the cell)
The x coordinates for 'Peaches' series are all '1' (see Figure 3)
The y coordinates are '0' - '8' (see Figure 3)
The bubble sizes for 'Peaches' are taken from Figure 2 (including the blank cell immediately below 'Peaches').
Once you've added in all of the data series, you should see something like this:
Figure 8: Bubble grid chart, Adding data series

This still needs work -- but it is starting to resemble the finished product. The next step is to reverse the order in which the 'fruit conditions' are presented, so that these mirror the data table. To do this, right click the y-axis and select 'Format Axis'. Under 'Axis Options', check the 'Values in reverse order' box: this flips the order in which the different conditions appear.
The size of the circles can be scaled under 'Format data series - Series options': I'm going to use 65% for this chart.
NB: Make sure that you have selected 'Size represents Area of bubbles' not 'Size represents Width of bubbles'
Adding axis category labels
Excel 2016 won't allow you to specify a range of cells as axis values - so I'm going to set up some data labels that look like axis values. To do this, I need to add two more data series: one for the x-axis labels (fruit names) and one for the various conditions of the fruit (e.g. ripe, mouldy and so on).
To add a data series for the x-axis labels, select data, then add and name a new data series. For the x-coordinates, select all of the x-values that have an associated data series (for my example, the x-coordinates are {'1', '2', '3', '4', '5'}), as can be seen in Figure 3. All of my y-coordinates are '0' (see Figure 4: y-values for x-axis labels). I've set the bubble sizes to an arbitrary '2'. Once the axis labels are added, these will be resized to become invisible.
To add a data series for the y-axis labels, select data, then add and name a new data series. For the x-coordinates select a low y value (often '0', sometimes 0.5); for the y co-ordinates select all y-values that have an associated breakdown (for my example, the y-coordinates are {'1','2','3','4','5','6','7','8'}) as can be seen in Figure 3. Again, I've set the bubble sizes to an arbitrary '2'.
After following these steps, you should see like this, with a row of dots at the top of the chart, and a column at the left side: axes labels will be added to these.
Figure 9: Bubble grid chart: adding data series for axis labels

To add the x-axis labels, select the top-most data-series and add labels. Then click on the labels and select 'Format data labels.' Select 'values from cells' and select the cell range containing names of the data series charted (all the fruit names in my example). Position the data labels above the data points, and resize fonts if needed.
Follow the same process to apply y-axis labels, but select the cell range containing names of the outcomes / results (all the conditions of fruit in my example). Position the data labels to the left of the data points and again, resize the fonts if necessary.
Once you are satisfied, change the bubble sizes for the associated data series to a very small value (0.001 for example) and turn their colour fill to white: this effectively renders them invisible.
You should now have something that looks like this:
Figure 10: Bubble Grid Chart: ready for final formatting

This still looks a bit rough, but the last few formatting changes are straightforward:
- Add data labels (showing bubble size) to each of the data series. Centre the data labels, and adjust font size and colour to ensure legibility. Individually delete data labels where values are small - but use a consistent criteria.
- After making any adjustments needed to minimum and maximum axis values, remove the axes labels (the actual axes labels - not the data series labels that are pretending to be axes labels) and all grid lines.
- Check that you are happy with the scaling and the layout of chart text elements
- Remove the gray border around the chart area
- Check that the data are correctly charted.
Figure 11: Bubble Grid Chart: the final version
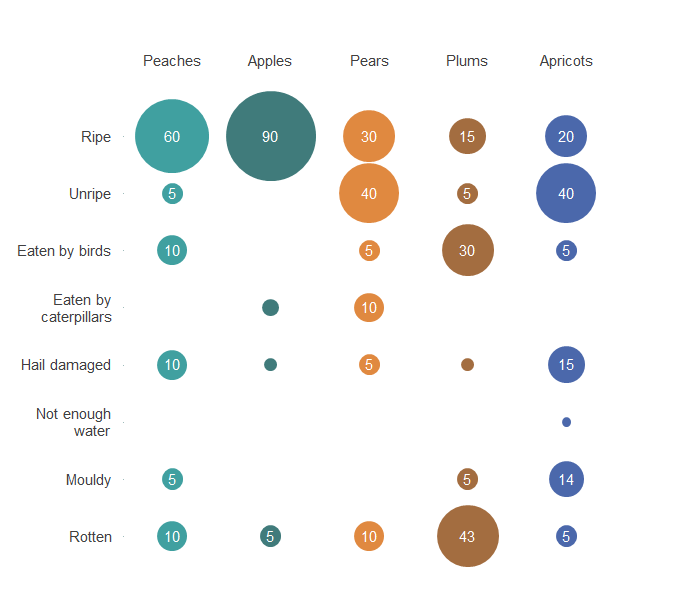
Note: Values of less than 5 are not labelled.
Bubble grid charts are a bit more complex than some chart types in Excel, but once you know how to set up the data for the chart, these are surprisingly quick to build.
No comments:
Post a Comment